Welcome on the 3ds max to Re-Volt exporter page.
The exporter is still in development and there can be remaining bugs. You can report these in the comments, or ask for new features ! ![]()
Why another exporter ?
Using this you can directly edit and modify inside 3ds max, then all you have to do is click “export” to see the modifications inside ReVolt. Plus, there are a bunch of new features coming along such as:
- All collision properties available
- Collision flags (object only/camera only)
- Transparency gradients
- Envmap gradients
- Texture animations !!
- Quad surfaces optimisations
- And more !
And of course all the existing features are still available (Lighting using vertex colors, doublesided polygons…)
Download
![]() >> ReVolt Exporter <<
>> ReVolt Exporter <<
Updated to Version 1.14
January 8 2018
Changelog :
1.14 – 8-January-18
- More useful Smoothing Group panel with surface properties
- Setting a material ID of 99 (or more) on a polygon will set the polygon to be untextured ingame
- Cleanup panel: the Search for “Zero edge” button will now select all the problematic vertices and all the problematic objects. You can also adjust the precision with the threshold value to fit your needs
- Cleanup panel: you can filter by Smoothing Group to apply angle threshold on quads, allowing to triangulate only double sided quads for example
- Fixed bug: in the texture animations properties, the final animation length was not always correct
- Fixed bug: the Search for “Zero edge” button now works on invisible edges too
1.13 – 5-February-17
- Added global scale multiplier !!
- New option for PRM export: shiny by default
- Env mapping is now defined in the same way for W and PRM
- New surface definition: SG27 now define a Semi-transparent type, unaffected by mirrors !
- Stats window now display file name and scale
- Fixed bug: texture animation wasn’t fully exported if active animation range was smaller than the defined one
- Fixed bug: PRM export using object pivot didn’t work properly !
- New “Adjust animation range” function in texture animation modifier + reviewed UI with more infos
- Removed custom SG flag 27: game crash when more than 1 car is on the surface !
- Pivot point is now centered on Edit_Meshes when exporting *.w files for more accurate bounding box
- Note: Global scale option in v1.12 Start Point helpers wont work. Replace by new ones !
1.12 – 24-January-17
- Added mirror support : *.rim files can be exported
- Added Start Point helper: useful to fill the *.inf file
- Added: exporting mirrors along with world files (one button process !)
- “Add Texture Animation” button selects last modified object
- “Add Mirror” button also selects last modified object
- Added help link
1.11 – 4-August-16
- Fixed bug: *.w export was no longer possible without using texture animation
1.10 – 29-June-16
- Modified the way texture animations are handled
- Added texture animation modifier
- Fixed bug for animation: coordinates were messed up
- Fixed bug for animation pick button
1.03 – 02-May-16
- Added functionnality “Reset pivot” for cleanup and convert functions
- Fixed a bug when an object had no texture channel
1.02 – 08-Apr-16
- Added statistics for export
1.01 – 06-Apr-16
- Unified export : PRM and W export should now work exactly the same
- Added “Keep quads” option for PRM export also to unify
- Default window size is now longer
- Added Backface culling display utilities
- Added Hidden edges display utilities
- Added bulk “Turn Edge” function to help with texture animation process
1.0 – 29-Mar-16
- First release
3ds max setup
To install (or update) just drag and drop the 3ds2rv.mzp file over a running instance of 3ds max and follow the instructions as shown in the following video:
By default you can no longer see both texture and vertex colors displayed in the 3ds max viewport but it’s possible by choosing any other display driver than “Nitrous”. Go inside the display driver configuration and change the driver, see video below:
F.A.Q., usage and known bugs
How to export
Select any object you want to export into ReVolt, open up the exporter panel, and click on the export button. You can choose to export an object (instance) as prm, or an entire scene (world) as w.
If you export large scenes/objects, the exporter may seems to hang (sometimes the progress bar freeze), just wait a few seconds and it should be fine.
Smoothing Groups conversion table
As with the ASE2RV tools, you can define surface properties using smoothing groups.
| Smoothing Group | Descriptive Name | Surface ID | Bumpy (relative units) | Grip intensity (relative units) | Particle color (if used) | Skid color | Skid sound |
|---|---|---|---|---|---|---|---|
| No SG Assigned | Default | 0 | 0 | 1 | Ø | Gray | |
| 1 | Conveyor Up | 16 | 1 | 1 | Ø | Ø | |
| 2 | Conveyor Down | 17 | 1 | 1 | Ø | Ø | |
| 3 | Slow Conveyor 1 | 24 | 1 | 1 | Ø | Ø | |
| 4 | Slow Conveyor 2 | 25 | 1 | 1 | Ø | Ø | |
| 5 | Jaws | 7 | 0 | 3 | Ø | Light Gray | |
| 6 | Grippy | 6 | 0 | 2 | Ø | Light Gray | |
| 7 | Shiny | 8 | 0 | 1 | Ø | Ø | |
| 8 | Grim Sunday | 2 | 0 | 1 | Ø | Dark Gray | |
| 9 | Trick | 3 | 0 | -1 | Ø | Light Gray | |
| 10 | Evil Trick | 11 | 0 | -1 | Ø | Gray | |
| 11 | Conspiracy | 9 | 0 | -2 | Ø | Light Gray | |
| 12 | Evil Conspiracy | 5 | 0 | -2 | Ø | Gray | |
| 13 | Super Slippy | 21 | 0 | -4 | Ø | Light Gray | |
| 14 | Mega Slide | 10 | 0 | -5 | Ø | Light Gray | |
| 15 | Bone Shaker | 13 | 1 | 1 | Ø | Gray | |
| 16 | Grass | 12 | 0 | -3 | Green | Green | |
| 17 | Flower Field | 4 | 0 | -3 | Cream | Light Green | |
| 18 | Gravel | 15 | 1 | 1 | Black | Light Gray | |
| 19 | Pebbles | 14 | 2 | 1 | Black | Light Gray | |
| 20 | Lord Muck | 19 | 1 | 2 | Brown | Brown | |
| 21 | Manor Born | 18 | 1 | 1 | Brown | Brown | |
| 22 | Lady Muck | 20 | 1 | -1 | Brown | Brown | |
| 23 | SG23 collision flag | Custom ! | (will add missing IDs desc here – 1/22/23/26/27) | ||||
| Smoothing Group | Extras | Possible uses include: | |||||
| 24 | Objects Only | Dont collide with camera | |||||
| 25 | Camera Only | Camera only, + shadows | |||||
| 26 | Texture Animation | Not available for .prm | |||||
| 27 | Semi-transparency On | Unaffected by mirrors | |||||
| 28 | Additive Transparency | Glow, special effects | |||||
| 29 | Invisible | Low poly .ncp model | |||||
| 30 | Environment On | Glossiness | |||||
| 31 | Double Sided Poly | Visuals only, solid on one side only | |||||
| 32 | No Collision | High poly texture model, deliberate holes |
You can also convert any track that was meant to be exported using the ASE2RV tools by a simple click. Open the “Convert ASE2RV objects” panel and choose either the Morph or Ali table. That’s it, ready for export. Note that using Ali table conversion, if you made any shiny or transparent material, you’ll need to manually apply these settings on the objects. To do this, just select the faces and change the vertex alpha (=transparency) and illumination (=envmap color) values.
If anything goes wrong during export, delete the layer named “Re-Volt Export Layer”
When exporting the objects are cloned to apply necessary modifications and put on an new layer named ”Re-Volt Export Layer” (see layer manager)

This way, even if a bug occurs and you unintentionally save your scene, all you have to do to repair it is delete the layer named “Re-Volt Export Layer” along with every object it contains.
3ds scene setup: backface culling + edges only
Faces in Re-Volt are one-sided by default. If they are doublesided in the viewport activate the “backface culling” option. A good practice is to turn on the “backface cull on object creation” 3ds max’s option
(Customize->Preferences…->Viewports).
Lighting and vertex colors
To show vertex colors in the viewport you must disable Hardware Lighting and not use the Nitrous display driver.
How to keep “quad” faces (4 sided)
Just turn on the “Keep quads” option.
Sometimes 4-sided faces are divided into 2 triangles because they are not completely flat (coplanar). To force a 4-sided face to be exported as a quad, just make it “doublesided”. This is particularly useful when dealing with texture animations.
You may also change the maximum angle between 2 triangles threshold. Try to keep this value very very low, visual glitches may appear as you increase it.
You may force a triangulated export of any object by adding an “Edit Mesh” modifier.
Texture animation orientation
To change the animation orientation on a quad just turn the middle edge. Every time you turn the edge you turn the orientation by one quarter turn more.
Bug you may experience using “Keep quads” option: a face may have no collision
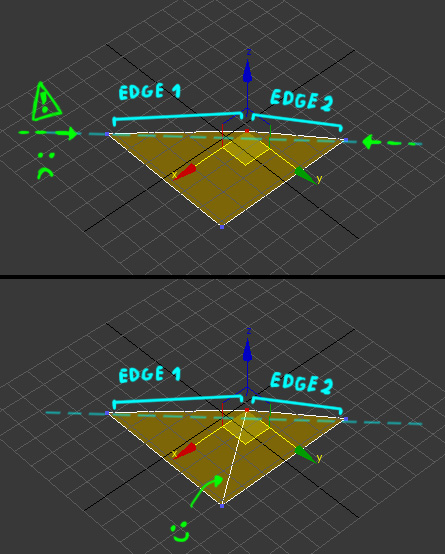
This is a bit tricky to explain, but to avoid any bug just add a middle edge when 2 edges on a 4-sided face are almost colinear (or more than 4-sided).

Note : the above example is exaggerated. For this bug to occur the 2 edges would have to be perfectly colinear, but better be safe than sorry.
You may also force a triangulated export of any object by adding an “Edit Mesh” modifier, wich will automatically solve any bug.
A good practice would be to add an extra middle edge on every non-convex face.
Zero edge bug.
Sometimes after export unexplained visual bugs appears (distorted envmap, invisible collision wall…) that may be caused by edges that have a length of zero. To solve the problem select the objects to export and click “Search for “Zero edge !”. If any zero edge is found the object in question will be automatically selected. Select all vertices and use a “weld” with a very low value !
You may try to see where the problem lies by looking at the object from “behind”.
Statistics
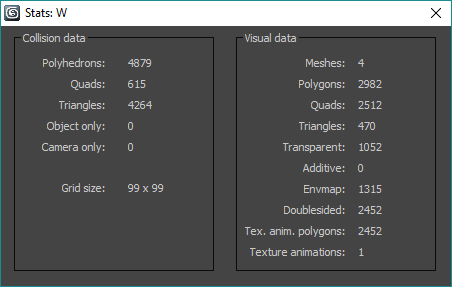
You can have a preview of what’s exported using the “Stats” option.

Here’s a list of currently known limits (Thanks to Huki for these infos) :
- 16383 solid polygons ( = polyhedrons) (65535 since RV1.2)
- 1400 transparent polygons visible at the same time (note that “additive” polygons are taken into account)
- 4000 envmapped polygons visible at the same time
- 16 texture animations (no limit since RV1.2 – Alpha 12.0405)


Hi mate. Could you help me with the texture animations? I have the frames i need but no clue on how to make them run in max?